
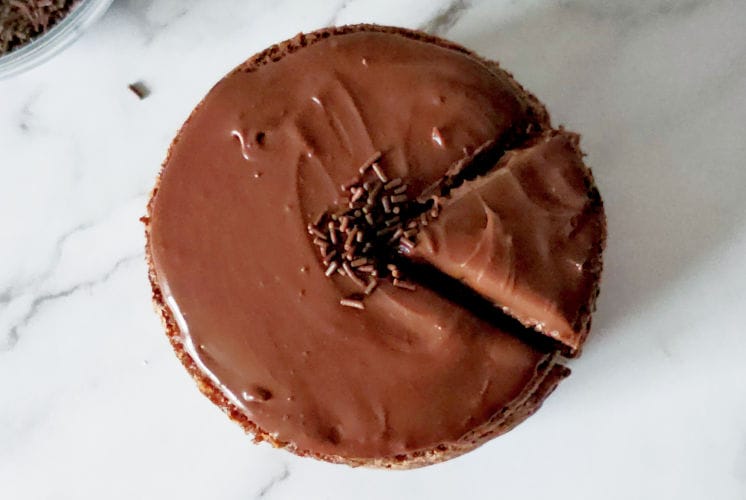
This mini chocolate mousse cake has creamy chocolate mousse sandwiched between 2 layers of chocolate cake and topped with rich and indulgent chocolate ganache.
Anything with chocolate is one of my all-time favorite desserts, and the best part is that this recipe is surprisingly easy to make. I have used the single-layer of chocolate cake recipe from my 4-in chocolate cake, then cut the cake into 2 parts, and added chocolate mousse filling between these two parts. Once chilled, it is topped with dark chocolate ganache.
Trust me, each bite just melts in your mouth with so many different varieties, flavors and textures of chocolate.
Ready to treat yourself with this chocolate heaven? Let’s dive into the recipe.
Why will you love this mini chocolate mousse cake?

- Perfect size to serve as an individual dessert.
- Ideal treat for any chocolate lovers.
- Melts in the mouth, luscious chocolate mousse.
How do you make a mini chocolate mousse cake?
Making this mini chocolate mousse cake is very simple, and let’s see how it goes.
| Sr. No. | Steps |
| 1. | Make the chocolate cake. |
| 2. | Prepare chocolate mousse and chocolate ganache. |
| 3. | Assemble the cake and chocolate mousse and refrigerate. |
| 4. | Garnish with chocolate ganache and serve. |
Mini chocolate mousse cake ingredients
Chocolate cake ingredients
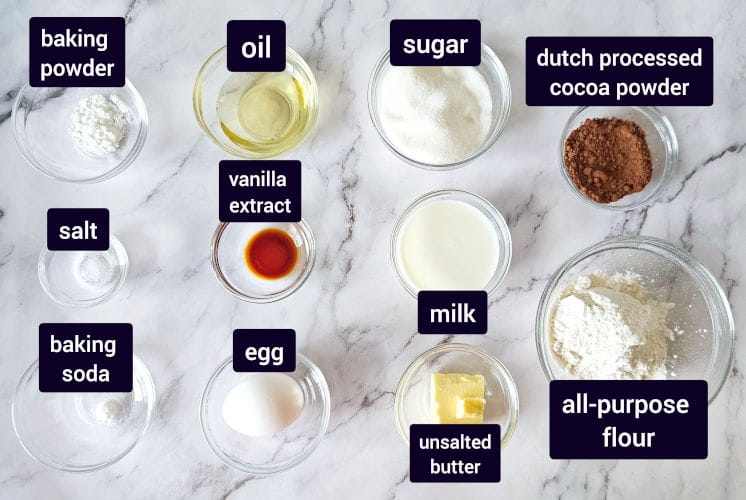
Dry ingredients
All-purpose flour – Use simple plain flour from your favorite brands. This gives structure to the cake. I do not recommend replacing it with any other flour such as self-rising or cake flour. (Self-rising contains leavening agents, cake flour contains less gluten, which will make it very light, makes it difficult to hold).
Dutch-processed cocoa powder – This is the main ingredient of our chocolate cake. This provides that deep, and intense chocolate flavor that regular cocoa powder doesn’t.
Baking powder – Works as a leavening agent, helps the cake to rise.
Baking soda – Another rising agent. reacts with cocoa powder and helps the cake rise.
Salt – As I always say, do not skip salt as it enhances the flavor of your dessert. We need just a pinch to balance the sweetness. But, skip it if using salted butter.
Espresso powder – We will need just half a teaspoon and you won’t taste coffee. In fact, coffee will enhance the flavor of chocolate so add it without worrying too much :).
Sugar – This provides the sweetness, of course. Use regular caster sugar or granulated sugar, both are same.
Wet ingredients
Unsalted butter – Use regular unsalted butter. Make sure it is at room temperature so that it mixes with other ingredients without overbeating. Use salted butter if that is what you have in the pantry but skip out the salt entirely.
Oil – Use any flavorless oil along with the butter to make a moist and tender chocolate cake. I do not recommend replacing it with butter entirely as it will harden in the fridge and we do not want that.
Vanilla extract – Just a half teaspoon but it will bring out the chocolate flavor and provide a nice sweet aroma to the cake.
Egg – Use a large free-range room-temperature egg. This acts as a binder and adds moisture to the cake. If you are in a hurry, then just put in a glass of tap hot water for 5 minutes and you are good to go.
Milk – This adds rich dairy flavor. Use any brand of milk which is 3.25%. It is ok to use 2% or skim milk but it will affect the flavor little bit.
Chocolate mousse ingredients

Dutch processed cocoa powder – cocoa powder is the star ingredient in this recipe. I would highly recommend using Dutch processed cocoa powder or Hershey’s dark cocoa powder for that intense chocolate flavor.
Heavy cream – Use heavy cream, double cream, or double-double, anything is fine as long as it is of 35% fat percentage.
Salt – Just a tiny pinch.
Vanilla extract –Use pure vanilla extract or vanilla imitation. Both are fine. Although, pure vanilla extract will provide deep, intense flavor, imitation would work too.
Icing sugar – You can use confectioners’ sugar, icing sugar, or homemade icing sugar.
Any substitutes?
All-purpose flour – Substitute plain flour with gluten-free blend to make gluten-free version.
Sugar – Replace sugar with allulose or monk fruit sweetener in 1:1 quantity.
Tools needed
- Weighing scale – to precisely measure ingredients.
- Measuring cups / spoons – to measure ingredients.
- Mixing bowls – to make cake batter and chocolate mousse.
- Baking tins – to bake the cake and assemble mousse. I have used a 6-inch cheesecake pan and a round pan in this recipe.
- Hand beater – to beat and combine ingredients.
- Parchment paper – to insert into baking tins.
- Toothpick – to check doneness of the cake.
- Piping bag/piping tip – to fill the chocolate mousse but it is entirely optional.
- Spatula – to spread the chocolate mousse.
Mini chocolate mousse cake (step-by-step) recipe
Chocolate cake step-by-step recipe
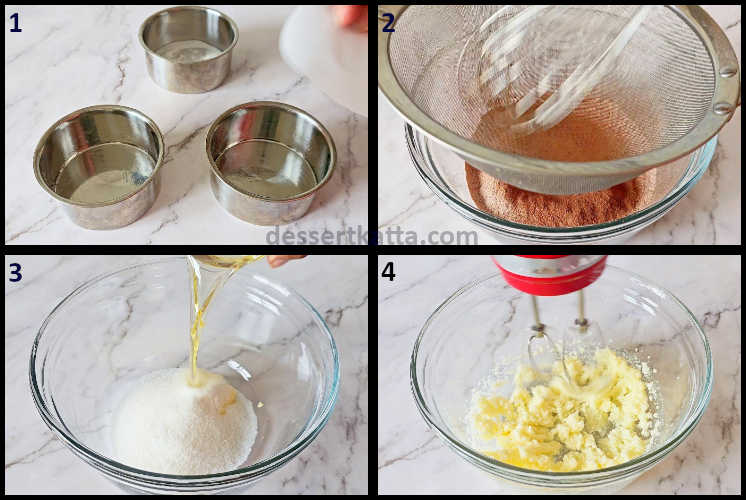
- Preheat your oven to 350°F or 180°C and prepare your pan. Coat the pan with either butter-flour ( just like the way I did for many of my cakes) or coat with oil and then a round of parchment paper.
- In a mixing bowl, sift all dry ingredients (all-purpose flour, cocoa powder, baking powder, baking soda, salt).
- Add unsalted butter, oil, and sugar to another mixing bowl.
- Start beating with a hand beater until it is light and fluffy. This will take around 3 to 4 minutes.
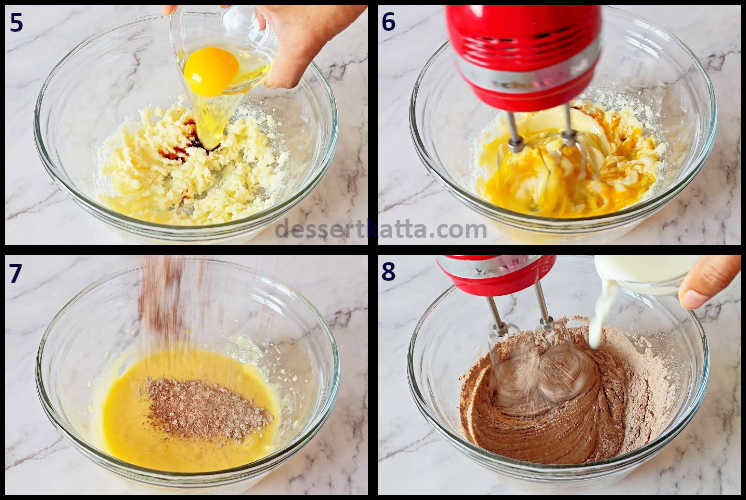
- Now, add vanilla extract and egg.
- Beat again until well combined.
- Add one-third of the sifted dry ingredients to the butter-sugar mixture and beat until combined. DO NOT OVERMIX.
- Alternate dry ingredients with milk and beat until it is just combined.
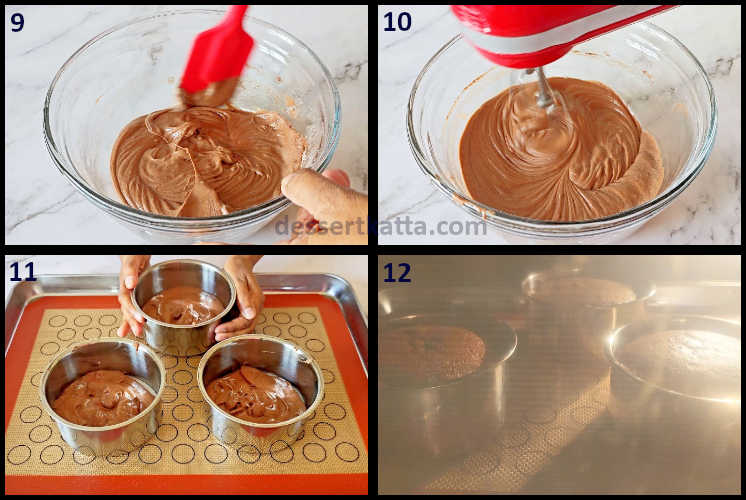
- Scrape the bowl. Make sure you scrape it from the bottom to mix any remaining flour.
- Beat again for just 15 seconds.
- Divide the batter into three 4-inch prepared tins. Each weighs around 115 gms.
- Bake at 350°F or 180°C for 20 minutes or until it loosens from the sides and springs back if we lightly press from the top.
Chocolate mousse step-by-step recipe
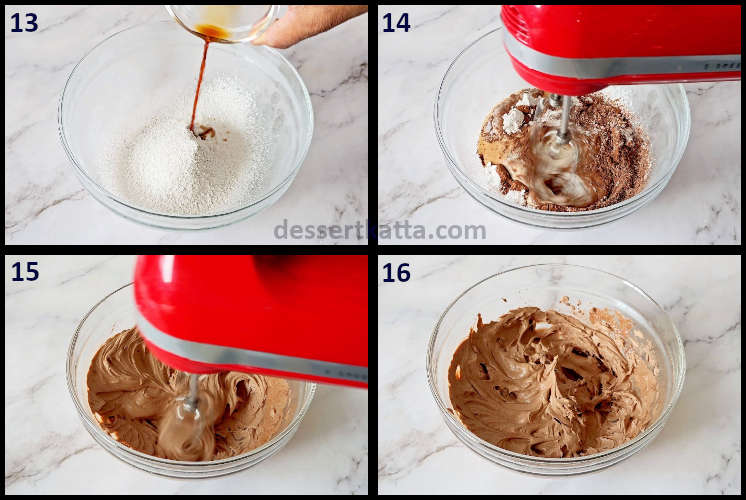
- In a chilled glass bowl, add chilled whipping cream, Dutch processed cocoa powder, icing sugar, vanilla extract, and salt. If you are using a stand mixer, then place the stand mixer bowl in the freezer for at least 20 minutes. (I am using a hand mixer, so I am doing it in a regular glass bowl.)
- Start whipping on low speed so that all ingredients will come together nicely.
- Increase the speed to medium and continue beating for 1 -2 minutes.
- Stop in between, scrape the sides, and continue until it forms stiff peaks. DO NOT overbeat as the cream will get separated.
Assemble
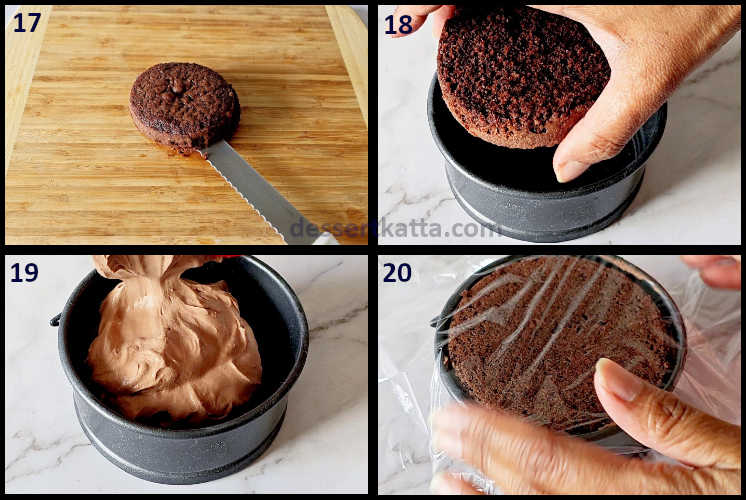
- Cut the chocolate cake in two portions.
- Place the top portion in the cake pan.
- Add chocolate mousse on top.
- Now, place the other half of the cake on top of the chocolate Mousse. Cover with cling wrap and refrigerate for 2 hours. Let’s prepare the topping in the mean time.
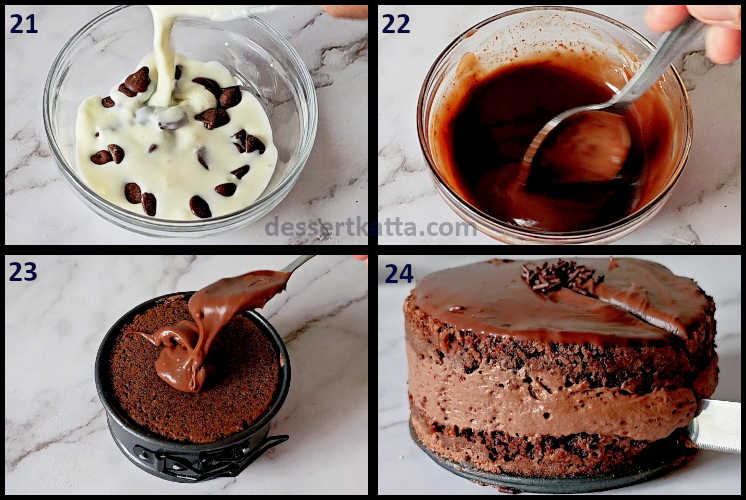
- Pour warm whipping cream on the chocolate chips. Let it sit for a few minutes.
- Slowly mix it using a spoon until properly mixed.
- Add this chocolate ganache on top of the chocolate mousse cake. Add some sprinkles on top.
- Cut using a sharp knife and serve immediately.
How to serve?
This chocolate mousse cake can be served as is or by pairing it with other things to make it look fancy. But in any case, make sure to serve it chilled. I have tried serving as mentioned below.
- Plain – Chill the final product for at least 4 hours before serving.
- Individual portion – I have prepared it using a 6-inch pan. Assemble the cake in a small serving jar or small dessert cup and serve as an individual portion. But make sure the cups or jar is not too deep as you would want to eat it with the cake. If it is too deep, you might just take the mousse part which will ruin the experience. I have used these jars to serve in one of the parties.
- Ice cream – Cut the cake nicely and serve individual piece along with a scoop of vanilla ice cream.
- Coffee or wine – Serve with your favorite hot or chilled coffee or a glass of wine is the perfect pairing for this indulgent chocolate mousse cake.
- Berries sauce – Drizzle some berries sauce on top. It will not only look appealing but also helps to balance the sweetness of the chocolate.
Watch me making it (video)
Storing and freezing instructions for the mini chocolate mousse cake
You can store this chocolate mousse cake in the refrigerator or in the freezer. Storing at room temperature is not a good idea as it contains perishable whipping cream which do require refrigeration.
Storing instructions
First of all, keep the remaining portion back in the cheesecake tin and tightly cover the tin with cling wrap. This saves the cake from fridge odors and tastes exactly the same as the day it was prepared first. Store this wrapped tin in an airtight container if you have one that fits tin otherwise refrigerate as is.
This will stay ok in the fridge for up to 5 days. After that, pop it in the freezer.
Freezing instructions
Once it is wrapped by cling wrap or plastic wrap, cover it with aluminum foil for extra protection and to prevent freezer burn. It will stay ok for up to one and half months to two months.
Thawing instructions
Just that the cake in the refrigerator overnight and you are all set. I do not recommend thawing it at room temperature directly as it’s texture might ruin because of temperature fluctuation.
In short,
Storing and freezing for naked cake
| Sr. No. | Storage Type | Duration (days weeks/ months) |
| 1. | Refrigerator | 5 to 6 days |
| 2. | Freezer | 1.5 to 2 months |
Variations
I have used dark chocolate ganache as a topping as everyone around me just loves it. I have also tried topping it with whipped cream and chocolate curls. Both taste wonderful but the ganache ones win here in my opinion.
I do not recommend using any nuts as it will ruin the smooth, and creamy mouthfeel of the mousse cake.
Secret tips to make the mini chocolate mousse cake

FAQs
If you have any further questions, please feel free to drop a comment below, and I will be happy to answer them.
Want to try some other chocolate recipes?
- Mini chocolate cake recipe.
- Melts in the mouth chocolate lava cake.
- Chocolate cupcakes with chocolate frosting.
Let me know what you think!
Alright, now it’s your turn to make this delicious chocolate mousse cake. Make sure to reserve a piece for yourself, as your friends are unlikely to leave any.
When you try this recipe, do not forget to leave a comment below and tell me how did it turn out for you. Also, tag @dessertkatta or use #dessertkattarecipes if you post your recreations on Instagram.
Recipe card

Mini chocolate mousse cake (4 inch)
Description
Whether you're making them for a special event or a midnight hunger, these little cakes are sure to satisfy—decadent but not too heavy, and they'll dazzle your guests and family. Trust me, after one bite, you'll be addicted!
