
In today’s post, I am going to share a homemade basic Starbucks creamer recipe that will give you the feel of Starbucks coffee without leaving the house. And, you will also save some bucks, which is significant in today’s economy, especially as the USA and Canada might impose tariffs in near future.
I am sure you are a Starbucks fan just like me, and that’s why you are here. Starbucks has tons of creamy, delicious-flavored creamers that they use to elevate the coffee. But what if you could recreate that magic in your kitchen?
This creamer is rich, smooth, and bursting with vanilla flavor. Customize it based on your liking. This recipe uses vanilla as the base flavor, add some salted caramel to make Starbucks caramel-flavored creamer, or add pumpkin spice to make Starbucks pumpkin spice-flavored creamer. Have a look at the different variations mentioned below.
The interesting thing is, that it only takes a few simple ingredients that you will already have in your kitchen. So, grab your coffee mug, and let’s get started. You will be sipping on your favorite Starbucks-inspired treat in no time!
Why you will love this Starbucks creamer?
Here are some of the basic facts due to which you will prefer to choose this creamer recipe.
- No fancy ingredients, uses basic pantry staples.
- Very easy and quick to make, you need just 10 minutes to prepare.
- Homemade, fresh, and super creamy.
- Cheaper than store-bought creamer – super important.
- Highly customizable.
Do I need to mention anything more? Grab the ingredients and dig into it right away.
How to make a Starbucks creamer recipe?
Making this Starbucks-style creamer at home is super easy. Here’s a quick overview of the steps
| Sr. No. | Steps |
| 1. | Combine all the ingredients. |
| 2. | Mix and store. |
Starbucks creamer ingredients
Let us have a look at the list of ingredients needed for this delicious Starbucks-style creamer. Please note that this is the list, the recipe card at the bottom has the exact measurements.
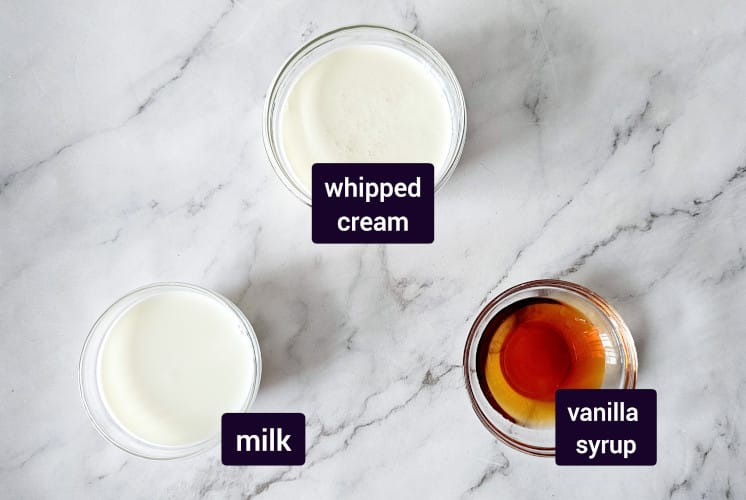
- Milk – This is the base of the creamer, making it smooth and creamy. You can use regular dairy milk, or go for almond, oat, or coconut milk if you prefer a dairy-free option!
- Vanilla syrup – A little sweetness goes a long way! The sugar balances the flavors and helps create that signature creamy taste you love in coffee creamers. You can adjust the amount based on your personal sweetness level.
- Heavy cream – This is the secret ingredient that makes the creamer extra rich and luxurious. If you’re looking for a lighter version, you can use half-and-half or a non-dairy creamer, but the heavy cream gives it an indulgent feel.
Any substitute?
- Dairy-free – Replace regular milk with soy milk, or nut milk in 1:1 quantity.
Tools needed
- Measuring cups / measuring spoons – to measure ingredients.
- Mixing jar – to prepare the creamer.
- Storing jar – to store the creamer.
Starbucks creamer (step-by-step) recipe
Make vanilla syrup
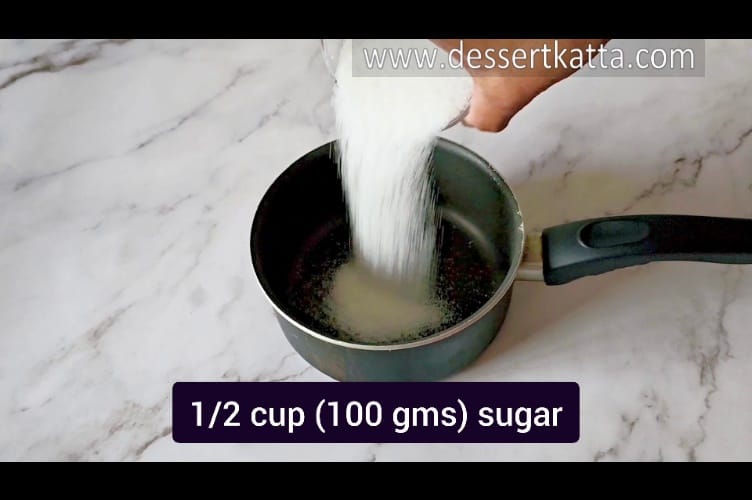
- Combine water and sugar in a saucepan.
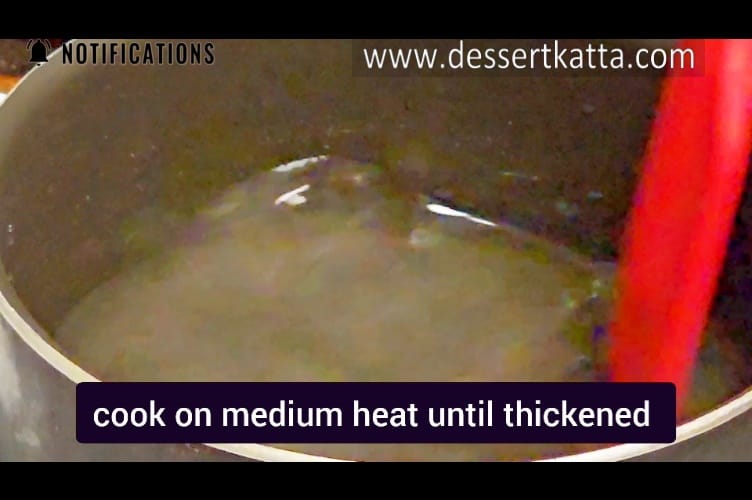
- Heat on low to medium heat until the sugar is dissolved completely and the mixture begins to boil and thickens. This is nothing but a simple syrup.
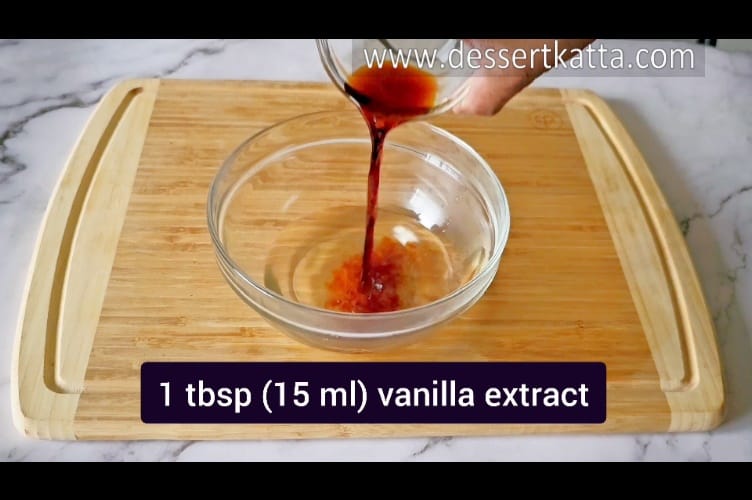
- Remove from the gas and add vanilla extract to it.
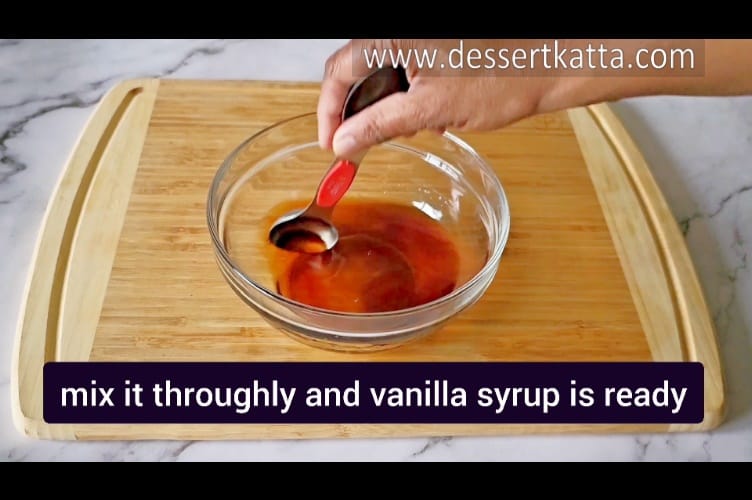
- Stir and keep it aside.
Make Starbucks creamer

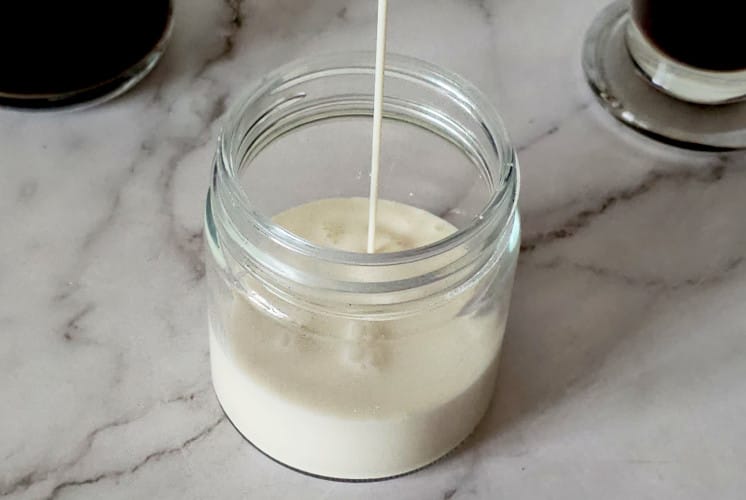
- Add milk, whipping cream, and vanilla syrup in a mixing bowl.

- Gently mix all the ingredients using a whisk.

- Pour into a storage jar.

- Secure the lid and invert the jar 10 times to combine. Be sure not to shake it as bubbles will form.

- Use it right away or refrigerate it for later use.
How to serve?
Do you know there tons of ways to enjoy it irrespective of it is hot or cold. Let’s look at them one by one.
- Hot coffee – this is no brainer. Just add a tablespoon or two in your favorite hot coffee and make it extra creamy. Use it more or less depending on its preference.
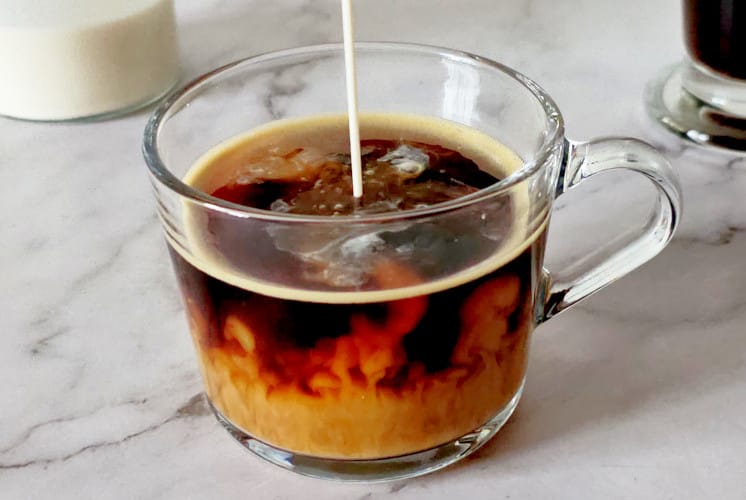
- Iced coffee – If you are a fan of iced coffee or if you live in a hot country, don’t worry. This Starbucks creamer can be used in your iced coffee. I have tried adding it into my Starbucks vanilla iced latte.
- Hot chocolate – This one is my favorite and why should coffee have all the fun? Add the creamer to your Starbucks hot chocolate for a richer, more luxurious taste. It’s like sipping on a cozy, creamy cocoa hug.
- Lattes – Best of all. Froth the creamer and add over the glass of espresso and create a fancy looking coffee just like the one you get in a Starbucks.
Do you think of any other alternatives? Please let me know in the comments below. I would love to try and be your coffee buddy.
Watch me making (video)
Storing and freezing instructions for Starbucks creamer recipe
You haven’t finished your creamer yet? Don’t panic. Follow my storing and freezing instructions which are very easy to follow.
Storing instructions
once you prepared the creamer, store it in the refrigerator or freezer as it’s highly perishable due to use of whipping cream.
Make sure it is sealed tightly after every use. They stay ok for up to 2 weeks. I doubt the creamer will stay that long though.
Before you pour, give the creamer a little shake. Sometimes the ingredients can separate over time (nothing to worry about, it’s totally normal), and a quick shake helps bring everything back together.
Freezing instructions
If you want to use it for more than 2 weeks or if you still have leftovers after 14 days, freezing it is the way to go.
I would recommend freezing it in ice cubes tray as an individual portion so you can use only those which you need.
To freeze, pour your Starbucks creamer into an ice cube tray. Freeze it for a couple of hours ornuntilnit hardens.
Once the creamer cubes are completely frozen, transfer them into a freezer-safe bag or container. Make sure to label it with the date, so you know when to finish it. It stays ok for up to 3 months.
Lot of time to make the yummy and creamy coffee. Isn’t it?.
Thawing instructions
You don’t need to thaw if using in iced coffee.
Bring it to room temperature and add it to your hot beverage as mentioned in serving options. Make sure the coffee is boiling hot as addition of creamer will bring down the temperature.
Variations
Customize this base recipe to make all kinds of delicious flavors. Let’s get creative, shall we?
- Caramel-flavored creamer – Simply add 1/4 cup caramel sauce (the kind you use for sundaes!) to your base creamer recipe. Use my homemade salted caramel recipe and skip out the salt to makenthis caramel sauce, it’s very simple.
- Pumpkin spiced flavored creamer – add 1/2 teaspoon ground cinnamon, 1/4 teaspoon ground nutmeg, 1/4 teaspoon ground ginger, and 1/4 cup pure pumpkin puree to make this fall inspired creamer.
- White chocolate flavored creamer – add 1/4 cup of melted white chocolate to the base creamer.
- Cinnamon dolce flavored creamer – Add 1 teaspoon ground cinnamon and 1/4 teaspoon nutmeg to the base mix. Also, use brown sugar while making vanilla sugar syrup for that rich, warm sweetness. It’s like having a cinnamon roll in your coffee.
Did you see how easy it is to make these variations? It’s all about getting creative with what you have on hand. So grab that coffee cup and start experimenting! Happy sipping!
Secret tips to make Starbucks creamer recipe
These little tips and tricks will take your coffee to the next level. Ready? Let’s go!
1. Shake it up! – always give your Starbucks creamer a good shake before using it. Creamers can sometimes separate over time (not a concern, it’s totally normal!), and giving it a shake helps mix everything back together for that smooth, creamy texture. Thank me later when your coffee is extra creamy!
2. Use the right ratio – Too little creamer? Your coffee might taste too strong. Too much? It could get too sweet and overpower the coffee. The trick is finding the right balance! Start with a splash (about 1-2 tablespoons) and taste-test until it’s just the right amount of creaminess for you. It’s all about personal preference, so adjust it to your liking.
3. Use cubes in iced coffee – Add a creamer ice cubes to make the Iced coffee even better. Instead of adding regular ice cubes that water down your drink, use freezed Starbucks creamer ice cubes. Genius, right?
4. Add a flavor boost – you can make thus Starbucks creamers in delicious flavors like Caramel, Vanilla, and Hazelnut. Just a tiny bit can elevate the flavor and complement your creamer in the most delightful way.
These secret tips will have you using your Starbucks creamer like a pro. Whether you’re perfecting your daily coffee or experimenting with new recipes, there’s always a way to elevate your drink and make it extra special.
What’s your favorite way to use Starbucks creamer? Drop a comment below and let me know. I’m always looking for new ideas to try out.
FAQ’s
How much Starbucks creamer should I use in my coffee?
It really depends on your taste preference! Some people love just a splash, while others prefer a more indulgent pour. Start with a small amount, maybe a tablespoon or two and then adjust to your liking.
Is Starbucks creamer gluten-free?
Yes! This Starbucks creamer is gluten-free.
Can I use Starbucks creamer for baking?
I do not recommend using it in baking unless the recipe mentions so. Some suggests to replace it with milk but in my opinion some ingredients can be replaced but some can’t unless modifying the entire recipe.
If you have any further questions, please feel free to drop a comment below and I will be happy to answer them :).
Want to try some other Starbucks treats?
- Starbucks Vanilla iced latte.
- Starbucks hot chocolate.
- Chocolate cake pops from starbucks.
- Madeleines from Starbucks.
- Starbucks red velvet loaf cake.
Let me know what you think!
Do not forget to leave your thoughts in the comments section below. I genuinely enjoy hearing from you, and your input is really important to me.
If you share the red velvet ice cream recipe on Instagram, tag @DessertKatta and use the hashtag #DessertKatta.
Recipe card

Starbucks Creamer Recipe
Description
With just a few simple ingredients, you can make this copycat Starbucks creamer in no time, adding that perfect touch to your coffee, lattes, or iced drinks. Ready to upgrade your coffee to next level? Let’s dive into the recipe!
Ingredients
Recipe
Make vanilla Syrup
- Combine water and sugar in a saucepan.

- Heat on low to medium heat until the sugar is dissolved completely and the mixture begins to boil and thickens. This is nothing but a simple syrup.
- Remove from the gas and add vanilla extract to it.
- Stir and keep it aside.
Make Starbucks Creamer
- Add milk, whipping cream, and vanilla syrup in a mixing bowl.
- Gently mix all the ingredients using a whisk.
- Pour into a storage jar.
- Secure the lid and invert the jar 10 times to combine. Be sure not to shake it as bubbles will form.
- Use it right away or refrigerate it for later use.
